“Se si pensa bene,
si cucina bene”
(F. Adrià)
Eccoci qui, tutti e due, con una nuova ricetta e un piano perfetto.
Tutto è nato da un’idea di Christian, che si sa, sul suo lavoro è uno preciso. Eravamo a casa, poi in un locale, poi di nuovo a casa, a pensare a cosa preparare con voi e per voi, quando a un certo punto lui dice “Se vogliamo fare le cose perbene, dobbiamo andare per gradi. Quindi No alla confusione, alla fretta che in pasticceria è il nemico numero uno, No alla ricettina facile facile che sembra dare un risultato immediato ma poco soddisfacente. Sì alla pasticceria.”
Cavolo! Ho pensato: “E adesso che si inventa? Per chi mi ha preso, per Antonella Clerici??” Ma non l’ho detto.
Però in effetti ha ragione, il mio Christian, perché voi che ci leggete meritate una rubrica fatta col cuore (e con la testa.. la sua, ovviamente!). Da qui, il piano.
Abbiamo pensato di creare una sorta di “ricette a puntate”, divise in più articoli secondo i passaggi che servono a realizzare il dolce in questione. Quindi dovete seguirci, mi raccomando! Ah, tanto per la cronaca, non abbiamo un piano B, quindi potreste gentilmente mettervi su la faccia da “che idea geniale!” ? ..Per tutti coloro che lo stanno facendo, Grazie. Infinite. Danke.
Dunque, parlavamo di ricette a puntate. Quella di oggi, di puntate ne avrà due. Per creare il dolce che abbiamo in mente, infatti, e che non vi sveleremo in questa prima puntata , serve prima essere a conoscenza di altro, che poi in realtà è la base per molte torte, e quindi ci tornerà utile anche in seguito. Garantito (dal pasticcere, non da me, tranquilli..).
Stiamo parlando della pasta frolla, una delle paste più utilizzate e più conosciute di sempre. Nella pasticceria italiana è praticamente un must, è semplice da realizzare e si conserva bene, è gustosa e facile da lavorare, è l’ideale sia per semplici biscotti che per torte più elaborate. Più di così!
Dunque, siete tutti pronti? Avete gli abiti adatti? Partiamo? Partiamo.
La ricetta della pasta frolla.
Difficoltà: Bassa (Dice..)
Ingredienti:
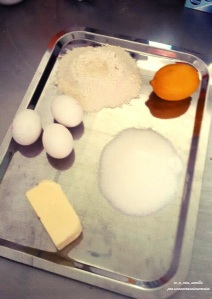
500 gr Farina 00 (Se siete n Germania Farina 405, se siete nel resto del mondo non lo so)
300 gr Burro
100 gr Zucchero semolato
100 gr Zucchero a velo
100 gr Rosso d’Uovo (circa 5 rossi d’uovo)
Scorza di un limone (facoltativo)
1 Bacca di Vaniglia (facoltativo)
Preparazione:
Prendete la farina, lo zucchero semolato e quello a velo e mettete tutto nella planetaria (se non ne siete provvisti, potete impastare a mano), usando il gancio a farfalla.
Lasciate girare e aggiungete subito la scorza di limone e/o i semi della bacca di vaniglia (se volete che la vostra frolla sia aromatizzata).
Prendete poi il burro – a temperatura ambiente – tagliatelo a dadini, e unitelo al composto che si sta creando.
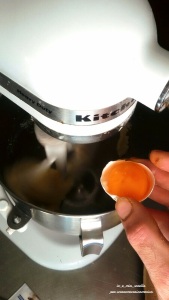
Quando il burro si sarà totalmente amalgamato al resto, procedete a unire i rossi d’uovo: versate il primo rosso, attendete che l’impasto lo assorba e poi passate al secondo, e così via fino al quinto.

Otterrete, dunque, un impasto morbido, liscio e uniforme.
Attenzione, però, tutti i passaggi sopra elencati devono essere svolti velocemente, perché se il composto gira (o viene impastato a mano) troppo a lungo, si scalderà eccessivamente e il burro si separerà dall’impasto stesso.
A questo punto avete la vostra pasta frolla.
Tiratela fuori dalla planetaria e lavoratela per darle la forma di un panetto.
Avvolgetela quindi in una pellicola trasparente o in carta da forno e mettetela in frigorifero per almeno 30 minuti.
Complimenti, il lavoro è finito!!
La nota nostalgica di Christian:
La pasta frolla ottenuta con le nostre dosi è per circa due torte. Per il dolce che realizzeremo nella seconda puntata, vi servirà la metà della frolla che avete: con quella che dunque vi resta, potete intanto preparare dei gustosi biscottini.
Avete metà del panetto, quindi: su un piano infarinato, schiacciatelo con i polpastrelli lasciando delle piccole orme. Mettete in queste ultime delle scaglie di cioccolato fondente, poi impastate di nuovo il tutto a mano finché le scaglie non si saranno incorporate all’impasto.
Avrete a questo punto un “nuovo” panetto di frolla e scaglie di cioccolato. Formate delle piccole palline delle dimensioni di 1,5 cm e mettetele in forno a 180° per circa 12 minuti. Una volta pronti noterete che avranno un colore dorato: bravi, avete fatto i vostri frollini!!
Quando ero piccolo, i frollini erano la mia colazione preferita. A volte, per ricordare quei momenti, ne mangio ancora. Però ora me li preparo da solo!!
Buona giornata a tutti e vi aspettiamo Lunedì per la seconda puntata!
Sabrina e Christian
“If you think well, you cook well”
(F. Adrià)
Hello! Here we are, both, with a new recipe and a perfect plan.
Christian came up with this idea and, you know, when it’s about his job, he’s perfect and precise. We were at home, then we went out and we were thinking about what we could prepare with you and for you. Suddenly, he said to me: “OK, if we want to do things well, we have to go step by step. So… NO to mess and hurry, which are dangerous when you’re cooking, NO to a very easy recipe which is not satisfactory at all and…. YES to pastry-making!” I thought: “And now? What could I do? Do you think I’m Antonella Clerici?? But I didn’t say that. Christian is right. Our readers deserve a special cooking feature, made with our heart and…his head, because he’s the pastry chef. Here is our plan.
We have decided to publish some sort of “recipe episodes” in order to show you all the steps to prepare a cake. So, follow us! And…we don’t have an alternative plan, so you could now think “What a great idea!”. For all of you who are thinking that our idea is a wonderful one, THANK YOU VERY MUCH. DANKE.
So, we said “recipe episodes…”. Today’s recipe is composed of two episodes. In order to make the cake we have in mind (we won’t tell you its name in this first episode), it’s important for you to know other things about pastry-making, which actually are the base to prepare a lot of cakes, so all this will be useful for the future. Promised! (Christian says so, not me!).
Today we’ll talk about shortcrust pastry, which is very famous and very used. In Italian pastry-making, we always use shortcrust pastry, which is a must! It’s easy to do and to store, it’s yummy and it’s perfect for easy biscuits and more elaborate cakes. Easier than that? Are you ready? Have you got your apron? Can we start? Ok, let’s start.
Here is the recipe for shortcrust pastry.
Difficulty: Easy (Christian says so…)
Ingredients:
Flour 00 (500g/18oz). If you live in Germany, you should use flour 405.
300g/10.5oz Butter
100g/3.5oz Sugar
100g/3.5oz Powdered sugar
100g/3.5oz Egg yolks (about 5 egg yolks)
Lemon zest
Vanilla (if you want)
Preparation:
Take flour, sugar and powdered sugar and put everything into a mixing machine. If you don’t have it, you can mix everything with your hands. Let the dough spin and add the lemon zest and/or the vanilla if you want your pastry to be flavored. Take butter (butter must be at room temperature), chop it and add it to the mixture. When the butter is blended, add the egg yolks: first put one, wait until the mixture has absorbed it and then add the second one, and repeat all this till the last one. You will obtain a smooth and soft dough. Remember! You have to be quick when carrying out all the steps described because if you stir the dough for too much time, it will warm up and butter will separate from it. So you have your shortcrust pastry. Take it out of the mixing machine and create some sort of loaf of bread. Wrap it up with cling film or bakery paper and put it in the fridge for about 30 minutes. Congratulations!! You have made your shortcrust pastry!
Christian’s remark:
If you use our doses, you could make about 2 cakes with your shortcrust pastry. In order to prepare the cake we’ll make in the second episode, you’ll need half of the shortcrust pastry you have prepared. You can use the remaining one in order to make yummy biscuits. You have half of your loaf so, put it on a flat surface covered with flour and start pressing it with your fingerprints. Take some chocolate chips and put them where there are your fingerprints. Mix it all again until the chips are well blended into the dough. Now you have a new loaf of shortcrust pastry garnished with chocolate. Create some small balls (about 1.5cm/0.6 inches) and put them into the oven at 180°C/356°F for about 12 minutes. When they appear golden and crisp…they are ready and violà your biscuits!!
When I was a child, biscuits like these were my favorite breakfast. Sometimes, I still eat them and it’s like going back to those times. But now, I prepare them myself!!
Have a good day and see you on Monday for the second episode!
Sabrina and Christian
Traduzione a cura di Chiara Ferri
Translated by Chiara Ferri


Wooow 😍😍😍
Grazie stellazzurra, proverai a farla? Facci sapere come viene, mi raccomando!!
Un bacio,
Sabrina e Christian
Aspetto la seconda parte per vedere la ricetta completa! 😉
adoro la frolla e sono molto soddisfatta della mia a dirla tutta 😉 Adesso vado a leggere la seconda puntata e…ci vediamo presto 🙂
Ciao Stefania! Beata te che la sai fare.. io senza il mio pasticcere sono finita!!
ma me pareva di averla già letta e commentata la “torta al formaggio” 😉 vabeh, aspetto altre ricette su 🙂 🙂 🙂
Presto nuove ricette, promesso!!